| General Information V8 engines, What to
expect. |
 |
|
|
Whilst we realize others may try to copy us & our V8 Engines'
high specifications
Be assured that 20 years of
V8s, and all they have to offer & have been fitted to, can never be
duplicated overnight or short term, by the many 'free loader' and 'discounted
suppliers'.
We strive to offer (wherever possible) without compromise,
first class 'Phone, mail and web based assistance' at all times, and, we think,
a second to none service backed up with many, many years of diverse day-to-day
Rover V8 experience to call on.
For
Land Rovers, Range Rovers, Discoveries, TVRs, TR8s, MGBs, Morgans, SD1s Marcos,
Cobras, West fields, Daxs, other kit and custom cars, trikes, planes &
more!
|
 |
| General V8 Engine information
|
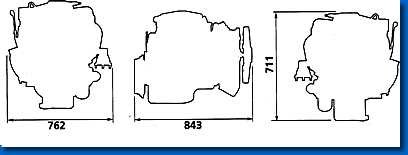
Dimensions of the Rover V8 engine fully dressed, and weighing
in at 230KG all up.
|
With the Rover
V8, it is never, 'how many miles they have done' but how they did them.
This is a typical low mileage engine, it is not uncommen to see such
contamination on a ten-year-old or older engine that has covered typically less
than 50K miles and has had only factory specified interval oil changes, but
please don't let this put you off,
on the other hand, a V8 that does a
thousand miles a week would last perhaps 200K miles and still be in great
shape.
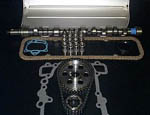
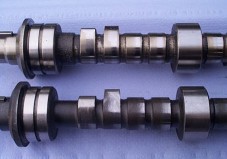
Almost all used Rover V8 engines that have covered in excess of
70,000 miles will be suffering, or beginning to suffer, from worn camshaft,
lifters and a stretched timing chain. This is normal with the V8 because these
engines are amongst the most forgiving.
The result is a gradual
decrease of engine efficiency and economy that goes quite unnoticed to start
with, this is due to the fact that although you have eight cylinders, the major
loss of efficiency, in only in one or two of them (typical of a worn camshaft),
may not be apparent until they have perhaps failed completely, as the remaining
good cylinders will mask the power loss effectively until severe enough to make
replacement unavoidable. However, if left this long, many other engine
components will have suffered due to this, and can lead to an engine's
condition being far too bad for an inexpensive overhaul.
Why unnoticed? With the hydraulic
tappets taking up the clearance as things wear away, by the time you get to
hear them, they are already very worn. The initial problem will be a gradual
loss of power over a few thousand miles. Also, you will notice the need for
changes in carburetor and ignition settings to cope with the excessive
emissions produced, seemingly from the engine as a whole but more likely the
individual cylinders that are suffering the most camshaft wear (causing loss of
full or correct valve lift).
This change in emissions (High CO and HC)
is why most mechanics would be incorrect when they advise that your carburetion
or ignition is in need of attention, when in fact the problem is more likely to
be camshaft wear, along with erratic ignition and cam timing due to the timing
chain stretch.
|
|
 Engine
capacities, 'To cut the confusion and mystery' Engine
capacities, 'To cut the confusion and mystery' |
| All RPi engine options have (as std.) additional specification
improvements upon O/E spec. with further upgrade options readily
available. |
|
The following
information regarding O/E engine specs and capacity is for those who have
asked, as well as for those who did not ask but feel they need to
know.
3.5.=89.5mm bore Std
3.5 crank
3.9.=94mm bore Std 3.5 stroke crank
4.2.=94mm
(3.9 bore ) plus and 4.2 longer stroke crank
4.0 is the same
capacity as 3.9 but uses later big journal crank and is cross bolted
4.6. + 94mm bore ( As per - 3.9 & 4.0) but uses later big journal
(long stroke) crank and is also cross bolted as is the 4.0.
Stage
1, Stage 3, as above and 4.8, 4.9, 5.2 big capacity big strength upgrades
are 'Specials' and are available only and exclusively from us.
|
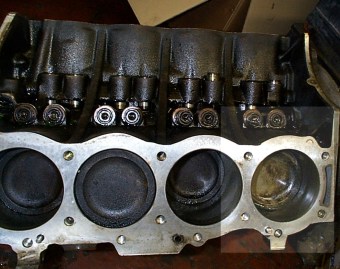
How can I tell the condition of my engine,
by looking inside?  |
| We all need to
start somewhere, and this is for sure the best and most reliable place to
start! |
|
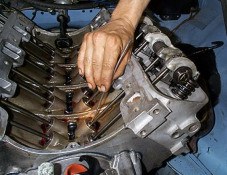
Take a good look inside even if only through the oil filler
hole.
Oh, and you will need a torch, a Penlight is best.
|
|
 A good look inside the rocker covers through the oil hole
will help you to determine the internal condition (and the minimum parts you
will need for a successful job).
A good look inside the rocker covers through the oil hole
will help you to determine the internal condition (and the minimum parts you
will need for a successful job).
if your are unsure, it will fall into one
of the following categories.
 Silver Alloy surfaces? Sounds like a new engine Silver Alloy surfaces? Sounds like a new engine
Brown tarnished? Very low mileage, dark brown? Perhaps higher mileage, but well
cared for.
Black? Getting poor, a full rebuild/replacement should be considered.
Black Coated & becoming
dense? Very poor condition, A rebuild is
normally required
Black and very
sludgy? Dead on its feet.
|
| |
| You can be sure this method is a reliable
way to determine what you have, and to help you decide what you should do. |
|
| Engine identification the visual way |
| |
| Gems - Sagem
injection |
Thor -
Motronic |
 |
|
|
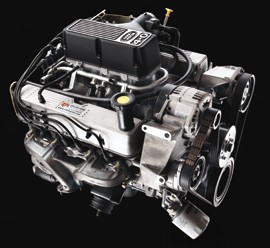
Although there have been a few variants in the V8
engine's injection systems over the years, none were so dramatic as the changes
made in or around 1999. I am talking about Motronic injection. You can see in
this picture a conventional style injection system with the square type plenum
chamber.
This one is Gems (Sagem) injection, and looks the
most familiar as it is pretty much the same at hardware level as its injected
predecessors; 'Hot wire' and 'Flapper' style injection systems.
|
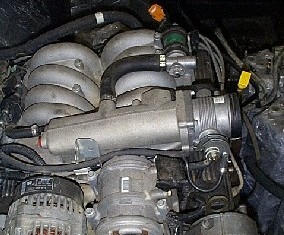
As you can see from this picture of the Thor
(Motronic) injected engine, the intake system is now looking completely
different, incorporating 8 tubular style intake runners rather than the square
plenum type shown above.
This intake was supposed to offer far greater
torque, which indeed it does.
However, this increased torque (and much
more besides) could have been gained much more simply by applying essential
upgrades such as chipping & hardware upgrades, rather than this complete
redesign.
|
|
|
| Identifying worn cams and tappets
|
|
It is easy to tell if a cam is worn out without removing the
engine or the need for close inspection.
When the tappets become worn
(normally 60,000 -80,000 miles) the tappet base becomes concave (dished), so
that when the camshaft rotates through 360 deg., the tappet will only ride on
the edges of the camshaft, and only make contact in the centre when it goes
over the (worn to shape) cam lobe. This has the effect of causing the camshaft
to be brown in appearance and shiny on the edges. The cam in a Rover V8 is
hydraulic in design, which means when it is manufactured the lobe is cut at a
slight angle so that it rotates the tappets, essential for them to fill with
oil. Even when the lobes still look intact, if the cam is starting to
discolour, it is well on the way out. It is important to change the cam before
it starts to wear away quickly because the metal particles produced will
rapidly cause further wear in the crank by becoming embedded in the white metal
bearings and softer aluminum rockers and causing further metal particles to be
produced. Replacing the camshaft and tappets before they get bad will greatly
extend engine performance and long life.
Longer
engine life, increased engine efficiency, smooth idle and good power, cannot be
expected from cams that look like this (and it is not an uncommon
sight).
|
|
|
|
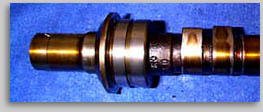
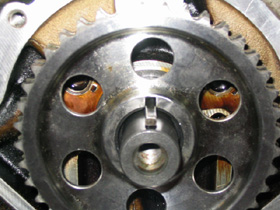
| Although you can see this cam is showing all the discolorations
mentioned, the Camshaft lobes showing are all becoming rounded on the
shoulders, it's clearly been bad for quite some time, and will have caused
considerable harm to the engine already, not to mention the engine's
performance and efficiency. |
|
|
|
|
It's clear
to see that the tappet on the left is already showing signs or becoming worn,
the centre is dished (concave). The trouble is that the cam and tappets will
get a lot worse than this before you can actually hear them, and the gradual,
long-term wear means you will not notice the power and economy losses either.
So check the condition of your engine by the method we describe above, and
judge for yourself if it's worth closer inspection.
|
| Replacing worn
tappets and cams |
Some so called
experts may say it is ok to fit new tappets without fitting a new camshaft when
all seems good. Not so.
At only 5,000 miles, this TVR engine had new
tappets fitted (without a new cam) by an appointed TVR. agent. They also had
the cheek to suggest the tappets must have been all faulty when we told them
they had all become worn or were beginning to wear (what, all 16?).
Never fit new tappets without a new cam, honestly, it's the only
way.
|
|
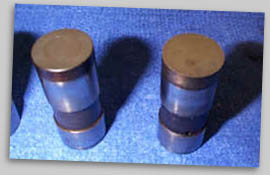
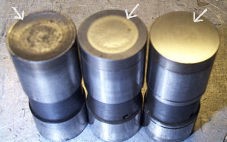
These three tappets have only done 5,000 miles on
the TVR engine they were fitted to. They tell a story from left to right, it's
not looking good.
|
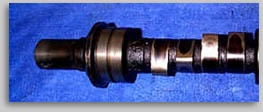
Comparing Cams: Top, at 35,000 miles and no sign of
wear, the Morgan cam is still looking good.
Below, this cam did not take to its new tappets, so it
was bad then, and worse now.
|
 |
 |
|
The left hand tappet
shows it is completely worn out and after only 5,000 miles it was the worst one
on the engine. As expected, it corresponded to the camshaft lobe that was most
worn (probably the one that was the cause of the tappet noise in the first
instance).
The middle tappet is
also quite dished and this was going to be the next one to become a major issue
soon.
The right hand tappet shows
the signs of wear (rounded indentation expanding from the centre) all other
tappets on this engine at only 5,000 miles were showing signs of bad wear, and
the three depicted above represent the extremes and average condition of what
we found and what you could expect.
By coincidence, at the same time
as working on this engine we started work on a Morgan +8 which was going
through a stage 3 upgrade. Its engine had done only 35,000 miles and all the
tappets were still in perfect order, indeed in better shape (all 16) than the
best of the tappets depicted above.
|
|
| Setting Tappet pre-load step by step |
Whilst most Rover or other publications do not touch
on this subject, it is extremely important (if assembling your own top end) to
carry out this operation. If you fail to do so, all may not lost and maybe
you'll not have problems, but the symptoms for those not so lucky will be lost
compression on one or more cylinders, and noisy tappets.
 |
Checking tappet pre-load can be
quite difficult and, as there are no special tools as yet available for it, you
will need to select varying sizes of welding rod, or fabricate your
own. |
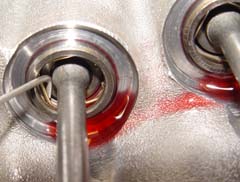
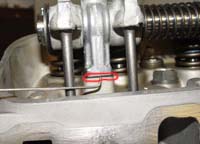
| The allowed tolerance is 20-50
thou. which is the distance measured between the top of the tappet's piston and
the retaining circlip. Each one needs checking individually with the cam
ideally 108 deg. off its lobe. |
|
| |
Nicely oiled
with cam shaft lube (the red stuff)
|
| |
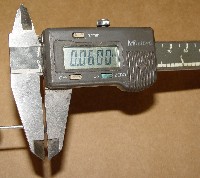
| To create your own tool, all you
need is a welding rod and a suitable device to measure it with. This rod is 60
thou, your best bet is to create 2 rods, one at 20-30 thou. and the other at
50-60 thou. This will tell you if your tappets are out of the allowed
tolerance, more rods will be needed to judge what size shims to
fit. |
|
| |
|
 |
Once you have ascertained the
measure of the tappets, pre-load adjustment is achieved by fitting special
pre-load shims under the pedestals. But beware, the rocker ratio is 1.6 that of
the clearance that needs correcting, so a 16 thou. shim will make approx 25
thou. difference. |
| |
| You MUST find an average shim
size, and fix it to EVERY rocker. So, for example, if you find that you have 4
tappets at 70 thou. and 4 at 80 thou. you would put 32 thou. shims on all the
pre-load of the tappets, making the 70 thou. tappets 25 thou. and the 80 thou.
35, thus all the tappets are within, or closest possible to, the allowed
tolerance. |
|
| |
 |
To attach the shims, you need
to slacken all 8 of the 14mm bolts.
Then, one bolt at a time, nearly
remove them so you can slide the shim underneath, then slightly tighten the
bolt so nothing slips or slides. Do this for all 8 rockers.
Then to
tighten the bolts, start with one bolt and tighten by a couple of turns of the
spanner, then go onto the next one. Keep going round till all the bolts are
tight. The eventual torque setting for the bolts is 35 Lb/ft.
|
|
| |
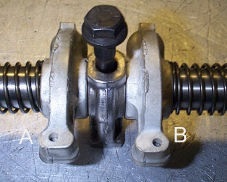
| Rocker arms and shafts |
| |
What to do and not to do (2021 update)
Why do the steel rocker shafts wear away and not the
all-alloy rocker shafts that run on them?
As an engine's internal parts
start to wear out (cam, tappets and timing gear first), metal particles (swarf)
are created and set loose to run around with the oil in your engine. Although
your filter will trap most of the larger particles, oil filters (especially
cheap or old ones) will not stop this swarf from reaching the vital soft metal
components (cam bearings, main bearings, big end bearings and alloy rockers)
where it soon permanently embeds itself into the soft surface of the alloy and
white-metal bearings, turning them into a very effective abrasive surface (the
end is nigh). Consider this also, why do steel cranks need re-grinding?
Because the white metal surfaces of the big ends and main bearings, with this
abrasive quality, soon gouge into the hardened steel surface.
Our advice for rebuilding this area is to re use genuine rocker arms only once closely inspected or buy new genuine arms.
However if re using original genuine arms it is important to make sure
that the abrasive quality that they may posses from previous years use and neglect is removed. The easiest way to do this is to simply lubricate
some 1200 wet and dry paper and run it around the inside of the rocker arm
lightly. This is not to remove material but in effect off a light hone to the surface to remove any sharp shards of swarf.
Once this has been done
the re assembly can take place on brand new shafts.
Once this is done cleaning through the oil hole to the cup and then a thorough clean of the arms itself is the final step in rocker arm preparation.
Why not use new aftermarket rocker arms
Quite simply because we saw too many issues with the ones available, either with pads breaking up or bad tolerances to the shaft meaning too much oil flow to the head and low oil pressure. |
|
|
 |
 |
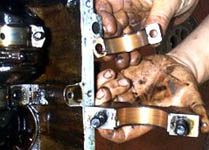
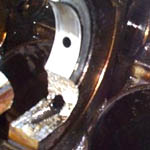
These
bearings are your worst nightmare. Any sign of copper means you need to do
something quick.
|
Often
closer inspection will show hair line cracks, don't ignore them, as this is
what you can expect.
|
If the rocker shafts are worn, it is a sure sign that the
surface of the softer aluminium rockers is contaminated with particles from
existing engine wear. Replacing the shafts without the rockers is worse than
doing nothing.
Why? Because new shafts will be eaten away by old rockers
and create even more damaging metal particles to cause yet more engine
damage.
Not the best thing to have after an expensive
and
time-consuming engine rebuild.
If they are worn, replace them all.
| Assembling rocker
shafts |
One of
our customers very kindly sent in the following on assembling rocker
shafts.
We have added to it where necessary and it is now here for you to
follow when building up your rocker shafts.
Click here to see what he's
put together
|
|
|
|
| Camshaft changes (serpentine type) |
The later type Serpentine
V8 engines have the camshaft further retained by a fixing plate (secured
with two bolts). There are still a few upgrade cams on the market that do not
have the added machining to re-use the fixing plate, ours included, but
we're working on it! This, however, is not actually required, as nothing
else has changed with the V8 engine and its 35-year-old design to make this
fixing plate necessary, indeed the rotating chain would hold the cam true, as
would the thrust casting that is still present on all later type timing covers.
| Oil
pressure won't prime |
Assuming you have packed
the pump with Vaseline or grease, you have a fully charged battery, and, better
still, the plugs are removed.
Maybe:
The
distributor drive gear pin has come out, or the drive is spinning on the
camshaft
The pressure oil relief valve is stuck open in the pump
body
The pump drive gears are not broken
The
strainer pipe is not fully tightened due to incorrect bolt or the gasket is
split
The stainer has a crack or fracture above the oil level line,
or is perhaps blocked. |
| |
| Pre-96?, then this is your Head Gasket
Problems |
|
From top:
1. New head
Gasket, (can't fault it)
2. Head gasket
after 50,000(ish) miles, notice the upper edge is showing a high degree of
discoloration whilst looking good on the lower edge, and no blows but obvious
leakage from all cylinders.
3. As 2, but the
leakage is so severe the gasket is breaking up. and allowing compression to
leak into the oil and water jackets.
|
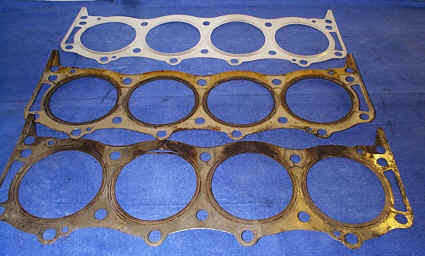
Because the V8
engine is so forgiving, most engines will get to stage three before any
indication of this problem is apparent. |
|
 For serious engines, use
the head stud kit. For serious engines, use
the head stud kit. |
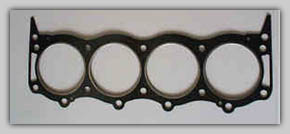
One solution (but it lowers compression ratio) the composite
type head gasket. |
What's the problem? You can
see the discoloration.
All pre-96 V8s with the 14-bolt heads (yes,
that's all of them) have this problem to some degree. It's maybe not causing a
big problem (or so you think), but it's steadily killing off the detergents in
your oil.
Older engines seem to suffer more, possibly
because they usually get less frequent oil changes, when they actually need far
more. The secret of the correct oil change interval is not when 3,000 or 6,000
clocks up, but when the oil is visibly contaminated and no longer able to do
its job efficiently. Most people don't realize that the quality and detergent
level of an oil are actually far more important then its viscosity. A reputable
oil, changed often, is far better for your engine than much more expensive
synthetic oil changes done less frequently.
All post '96 Rover V8 engines no longer have
the outer 4 head bolts on each bank, this is what the engine has always needed,
but it took Rover 25 years to realize it. The following solutions/actions are
available to you.
Do Nothing. Well Rover got away with it for 25
years. It's a far-off, long term problem on new engines and an immediate
problem on all pre '96 used, medium to high mileage engines, of all assumed
conditions.
Use conventional tin (shim
steel ) gaskets to retain compression ratio. This is actually better
than it may seem, you can (we would) refit the outer 4 offending bolts as
Rover, but torque them to only 20-25ft/lb so they fill the hole but have no
detrimental effect, this is generally the best option if your head and block
faces are new or near perfect order.
Fit composite gaskets.
This is the surest way of getting the best head gasket seal, but unlike the
above option, will lower the compression ratio by a factor of about 0.6-1
(important to some but not to most).
How much lower? As an
example, a 9.35-1 compression engine would realize a compression of about.
8.65-1 using composite gaskets (composite gaskets are thicker than conventional
gaskets by a compression factor of about 0.6-1).
Composite
gaskets would be the preferred option if you are using post '96 cylinder
heads as they have a combustion chamber size reduced from 36cc (pre '96) to
28cc. This reduction in combustion chamber size compensates for the use of the
composite gaskets, and compression is retained. Composite gaskets should also
be considered when ultimate reliability is far more important then the slightly
reduced reliability of shim steel gaskets, and when the Nth degree of power is
not the overriding factor.
|
|
| Rover timing chain sets Pre-98? This could be
'yours' |
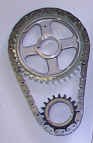
Stock Timing Gear
This rather weedy looking
thing is the stock Rover timing chain set, unchanged for the past 30 years. One
major problem it suffers from is stretching, and a stretched timing chain will
cause significant problems with advance and retard under acceleration and
deceleration to both cam and ignition timing. Most are badly stretched, but
higher mileage engines will have a major problem in this area. |
 |
| |
|
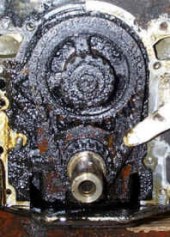 |
And this is what
they so often get like.
In this picture you can't see the
stretch, but you sure can see how tolerant the V8 is, this engine had been
(like most) running for many thousand miles in this condition before it finally
died.
This is what so often happens when you leave things until they
go bang, it costs so much more to correct it this late, and the results may be
less than that of rebuilding a cleaner engine.
If you are amazed that
things can get this bad, go back to our head gasket section and you will
realize just how much contamination can occur when the detergents in the oil
can no longer do their job.
|
| |
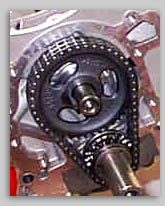 |
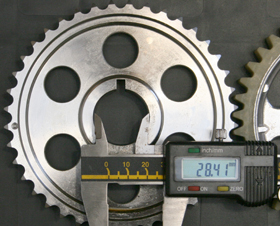
J&P Duplex Timing Gear
The J&P Duplex timing chain set not only solves the problem of premature chain stretching, it also offers alternative cam timing options and a Roller chain, as well as being available at a very economical price. It is also offered in all our camshaft kits.
See our special offer pages. |
Yet more & similar
info on our FAQ V8 General Info faq section.
|
| Improved oil feed to distributor drive gear with JP timing chain |
|
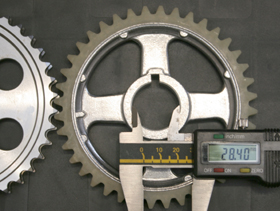
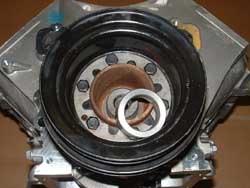
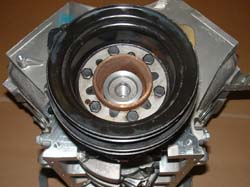
You may notice that the new JP timing chain set employs a deeper machined journal for the woodruf key location, of the pulley (shown here without the chain). Thus it has come to our atttention that this may cause concern and we would like to offer the following advice. |
|
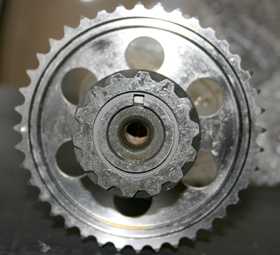
With image one and two shown below, you will notice that the internal size of the 2 pulleys, original and J&P, are almost exactly the same. Therefore the original key will protrude into the machined slot by the same amount, and thus for this scenario is not a problem.
It has also been suggested that any movement or deflection of the woodruff key may cause a problem, however this is not possable due to the following points.
1. The woodruff key cannot press into the camshaft key way slot any further as it already sits at the bottom of the machining, nor can it rise out of its slot and lose contact with the camshaft itself as there is more than sufficient height in the woodruff key way to maintain more than enough contact.
2. The woodruff key cannot move forward as it would also need to rise (due to being a crescent shape in a crescent shaped machined groove) and the front spacer and gear will not allow this due the original slot size. Added to the fact that the engine's oil pressure will hold the key way down.
3. The woodruff key cannot move back as the rear of the woodruff key is flat and hard up against the camshaft locating boss which is also a larger diameter than shown at the front.
|
|
|
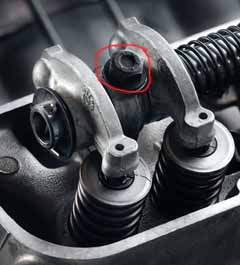
| Cam shaft thrust plate. Is it necessary? |
Cam locating device on more modern Rover V8 engines
This
is no more than a plate that bolts to the block and prevents the cam from
sliding forwards (due to rotation of the chain).
Is it
needed?
Basically the early engines pre-'94(ish) relied on correct
camshaft location because they had the taut timing chain running around
it. |
 |
| This relies on centrifugal alignment (like a
giroscope), however the early engines did have better cam-nose to timing-cover
clearance (this is between the end of the cam and the inner surface of the
timing cover) indeed, the timing cover has a pad on it which acts like a
stop. |
 |
|
|
| Rover Main bearings area and 'Stud Kit' |
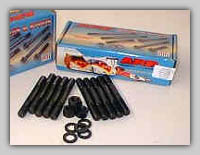 |
Main bearing stud kit
The main bearing stud kit is an essential part of any serious engine rebuild. If you don't go this far, then be sure not to re-use your existing mains bolts, as failure is common and leads to total engine destruction. If only a few pounds for the Stud Kit is considered over the top, then at least use new bolts |
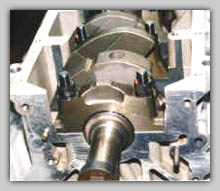
Main
bearing stud kit installed on an '87 block, torqued down to
90 ft./lb (std
bolts 55 ft./lb.) ensures the best possible engine strength. |
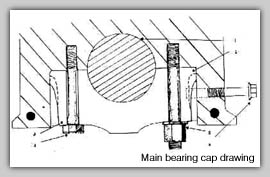
Ok. So you can't see Click
here or on the picture for the larger image. |
|
|
 |
 |
| These bearing are your worst nightmare.
Any sign of copper means you need to do something quick. |
Often, closer inspection
will show hair line cracks. Don't ignore them, as this is what you an
expect. |
All later (post '96) Rover engines have
fully enclosed main bearing caps, (you will see from the picture on the left
that the main bearing cap has no contact with the engine block).
All later
(post '96) Rover engines have fully enclosed main bearing caps, (you will see
from the picture on the left that the main bearing cap has no contact with the
engine block) See the (right) diagram also.
All post '96 engines have fully
enclosed engine main bearing caps and the 4.6 has them cross-bolted as well, it
goes to show the weakness we have always known about in the Rover design has at
last been recognized & rectified, So, if you have a pre '96 block then the
stud kit will be a good choice. |
| Engine covers etc. |
Please make sure your engineer has prepared the external
parts that are being re-used (if any) to the highest standard of cleaning
(even in the places you can't see).
Acid dipping is recommended on any
aluminium components, if not, a strong paint stripper (Nitromors or
similar) and some hard work will do.
Avoid using silicon type gasket
sealer, the faces should be good enough to seal without it when using correct
gaskets. In any case, if you must use silicon type gasket sealer, use it
sparingly to avoid the possibility of any finding its way inside the engine. It
is a very common sight to find the sealer blocking the oil ways and causing
further damage within the engine. Use non-hardening gasket sealers when at
all possible.
|
|
| Exhaust and intake |
Check all manifolds and carbs. (or injection plenum) for
contamination (especially if the old engine suffered from broken piston or
valves etc.) that can get drawn back into your new engine. This includes both
inlet and exhaust manifolds and any associated parts (assuming you are re-using
anything not supplied new by us).
|
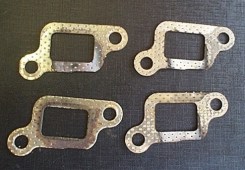
| Exhaust gasket alignment |
Although it may seem
obvious, which way round you fit the exhaust
gaskets, it is very possible to get it wrong, We strongly suggest you
check [& double check] the correct alignment as the following 2 pictures
will show, getting it wrong has serious power loss implications.
 |
|
 |
It's clear to see
just how wrong things can be. The problem
is not 'the wrong way round', but 'inside out & the wrong way round'!
|
|
Surprisingly enough,
exhaust blow was not a problem but power was 40%
down (minimum), especially as rpm. increased.
|
|
|
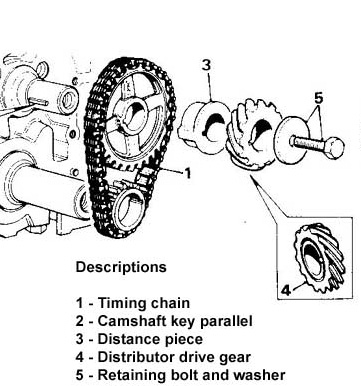
| Timing chain removal and
refitting |
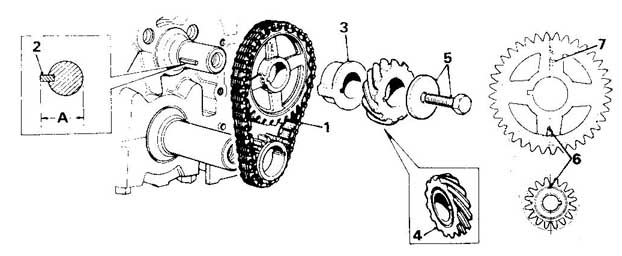
Descriptions
| 1 - Timing
chain |
4 - Distributor
drive gear |
6 - Timing
marks |
| 2 - Camshaft key
parallel |
5 - Retaining
bolt and washer |
7 - 'FRONT'
marking |
| 3 - Distance
piece |
|
|
|
| Fuel lines |
Make sure all fuel and oil lines (inc. oil cooler if fitted) are
replaced, or fully cleaned, always use new air and fuel filters (of reputable
quality), and it is very important to re-check the fuel filter for
contamination after only a few hours of running, always check inside the tank
for fuel contamination & replace if required.
|
|
| Fitting Kit |
|
 |
 |
 |
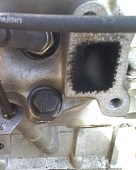
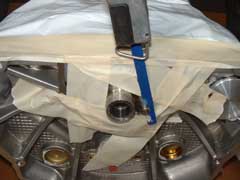
The old
blanking plug has a hole in it for the crank angle sensor that the GEM's engine
management system uses.
|
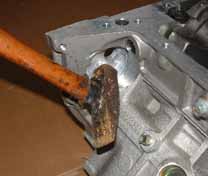
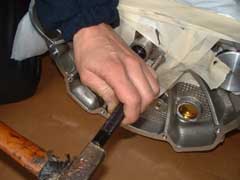
This has to
be removed for our blanking plug to be fitted. Removal of this is very easy, a
small tap with a hammer will knock the old plug out.
|
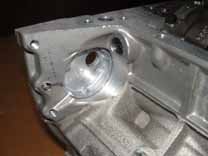
The
blanking plug that we supply fits in place of the original and just needs some
silicon to ensure it stays in place.
|
|
 |
 |
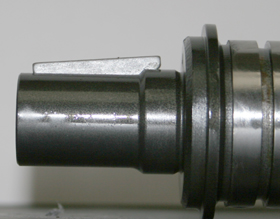
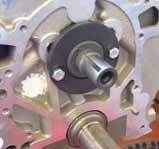
The dowel in the end
of the crank shaft has to be removed to enable the flywheel to fit correctly.
You should ensure that the crank seal is completely covered, and also the
bottom end of the engine, so that no swarf can contaminate it.
|
Using a hacksaw (or air hacksaw as
seen here) the dowel has to be cut off as flush to the end of the crank as
possible. |
 |
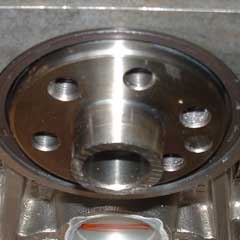 |
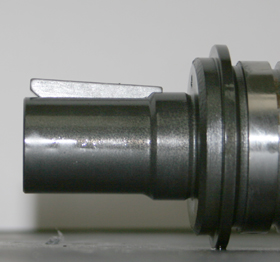
A centre punch is
then required just to knock what remains of the dowel into the hole so that it
does not protrude from the face as seen in the next picture.
|
As seen here the dowel has been
cut off and then punched back into the end of the crank so that there is no
chance that it can interfere with the flywheel.
|
|
 |
 |
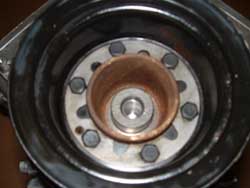
The crank is slightly
longer, which means that when you do up the front pulley bolt, it would not
actually come into contact with the pulley and therefor the pulley will be
loose. |
As you can see here we have made
a spacer that fits over the crank end. Now, when the pulley bolt is tightened,
everything is pulled together as it should be.
|
|
 |
|
|
|
| EFi. fuel pressure regulators |
We have had instances,
where the EFi fuel pressure regulator has been fitted the wrong way
round. This caused a new engine to run only 7000 miles before its demise due to
excessive (uncontrolled) fuel pressure. It ran so rich that all cylinders were
badly coked up and eventually caused a valve guide to drop into the cylinder,
causing severe damage to the piston etc. (I hate to think what the fuel economy
was like).
. |
|
| Automatic gearbox flex
plates |
In cases of broken crank
shafts, the old flex plates may contact the rear of the engine block. This will
cause stress of the metal and a failure of the flex plate after some miles
behind the new engine. Be sure to inspect the flex plate and the back of the
OLD block for signs of contact.
Aluminium bits in the ring gear are a
sign of contact and, if found, replace the flex plate no matter what. In cases
of a broken crank shaft with an automatic, ALWAYS replace the flex plate if
possible, or have the original flex plate tested for cracks that can not be
seen with the naked eye.
Flex plate failure shows up as a rattle at
idle under no load that goes away when power is applied. Replacing the flex
plate means gearbox removal, so check it carefully.
|
| Automatic gearbox fitting
& consideration of what went wrong, 'before' |
Important !!!
When fitting a new transmission (or indeed any major component
similar) to your car, please be sure all associated items that may be able to
transfer contamination, including contaminated fluid/oils or other such issues,
are thoroughly flushed, cleaned or renewed. This applies to your transmission,
so be sure that the oil cooler and associated parts/pipe-work/unions are
impeccably clean internally, and make sure the transfer box is cleaned out
prior to fitting to your new Auto-box. Also, after you have fitted it, change
(renew) the fluid completely after only 200 - 300 or so miles This will further
flush the system, And if it comes out contaminated, do it again after another
500 miles.
Consider what caused the old one to fail
Sometimes automatic transmissions are damaged (have failed) because water gets
into the transmission oil cooler pipes where they pass through the radiator in
the radiator header, have this checked or get them renewed.
|
|
| Cooling |
Make sure your radiator is in perfect condition, with no
cooling fins rotted and no signs of leaks (these will show up as
blue/green/white) snail trails down the side, or blue colouration from the
radiator core itself. Always replace faulty radiators, and flush out the heater
matrix radiator. Also, beware blocked radiators, these are often ones that
leak, but that no longer leak generally because they have been filled up with
cheap fix fluids that block everything and are not wanted in your engine.
|
|
| Cooling system air locks |
It is also very
important to make sure the engine has no air locks, if the system has no
leaks then it should be easy to bleed out any air that would normally be
trapped in the top hose, or highest points of the inlet manifold (SUs. and
Strombergs have a bleed pipe in the 'V' at the top, these normally need
clearing).
The Edelbrock and Offenhauser manifolds often trap air behind
the thermostat, this can be overcome by drilling a small hole in the top area
of the thermostat but is not normally required.
|
|
| Cooling systems can cause total oil pressure
loss |
Overheating problems
on a V8 engine can cause the oil pressure relief valve to stick open and
destroy the engine due to nil oil pressure. Additionally there are the obvious
reasons not to run an engine excessively hot, especially for any prolonged
time.
|
|
| Overheating |
The best indication of
overheating on a road test would be the lack of heat coming from the
vehicle's interior heater fan, and eventually noisy tappets and
'pinking', (time to stop) this is in addition to the temp gauge, but you
can never fully rely on these.
|
|
| Priming Oil Pumps (engine) |
We only recommend and guarantee our engines when run with Valvoline VR1 20/50 oil
If your engine is supplied with the Oil
Pump base plate fitted, you can be assured that a priming agent (Vaseline) has
been packed into the oil pump gears to ensure trouble free priming, if it has
not been fitted then you will need to do this yourself to get oil to turn the
engine over if the distributor is not fitted (the distributor drives the oil
pump), but if you forget and the distributor is fitted you will need to
re-prime the oil pump before starting.
The best way to do this is not
to worry about starting the engine but to remove the plugs and the coil lead
and have a highly charged battery available. The engine (with the distributor
fitted) will crank over at a speed that should allow the oil priming to be
achieved in seconds (oil Light out and a visual check), and, unless you remove
the oil pump again, no further priming should ever be required.
|
| Priming tappets |
It is normal for the
hydraulic tappets to take some time to prime up and can often take two to
three minutes for them all to go quiet. To ensure your oil is primed, it is
always advisable to not only check that the oil light has gone out, but if you
have a pressure gauge, this is a good secondary source of information. If in
doubt, look inside (or remove a rocker cover) and check that oil is freely
flowing from the rockers, although only a small amount is to be expected.
|
| Getting quieter |
Another good
indication is that although you can still hear some, tappets, they will
start to quieten down right from the first moment, so if tappet intensity
quickly reduces, you can be sure that the oil has primed and safely run the
engine until the last ticking stops. (normally 1 - 2 mins.).
|
|
| Using primed tappets |
From time to time it may
be possible to receive an engine (or tappets) that is/are already partially or
fully primed. This means that the engine may go quiet within seconds, so this
is not a worry. However, in some cases it may mean that they will need to
release some oil before they can allow the valves to fully shut, so the engine
may appear to run on only 4.7 cylinders, again do not worry, as running the
engine at just above tick over will allow them to bleed down safely.
Acompression check at this stage is not viable as it will give a false reading
on any cylinders that have not yet bled down.
. |
|
| Some people won't listen |
We have known a customer
to insist he had oil (primed) at the top of his engine, because (he said later)
he could see it 'through the filler hole' (he did not tell us this at the time
though), only to find to his horror that it was the oil that he had filled the
engine up with, because removal of the rocker covers proved the rest of the
engine was completely dry of any oil. The engine was subsequently destroyed
before it had started its life.
|
| Careful with all that paint |
Please refrain from
painting the inside as well as the outside. This was a fully rebuilt engine
supplied to an overseas customer, needless to say, it did not last long.
|
 |
 |
 |
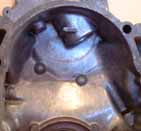
| It's hard to believe anyone could
paint an engine with all the bits inside it |
The strainer is showing the red paint blockage,
this engine failed completely within 20 miles |
Close up of the strainer shows the red paint
blockage |
|
|
| Look Behind |
On the back of the
engine, if possible, always check there is a crank oil seal, all core plugs
and the appropriate spigot bush /toe bearing (manual only) in the end of
the crank shaft, as removing the engine to fit them after it has been fitted
(about the time when you discover its been forgotten) is rather annoying if not
expensive.
If we have fitted the flywheel, you can safely assume the above
has been checked, but if you are fitting the flywheel, then it is in both our
interests to re-check.
|
|
| 3.5 Torque
settings |
General torque settings for a
Rover V8. engine.
| Description |
Torque setting |
| Air intake
adaptor to Carbs. |
17
lb/ft |
| Alternator
mounting bracket to cylinder head |
3/8 U.N.C bolt ::
25 lb/ft
5/16 U.N.C bolt 17 lb/ft |
| Alternator to
mounting bracket |
17
lb/ft |
| Alternator to
adjusting link |
17
lb/ft |
|
| Chain wheel to
camshaft |
45 lb/ft + lock
tight |
| Connecting rod
bolt |
35 lb/ft + lock
tight |
|
| Clutch attachment
to flywheel |
20
lb/ft |
| Cylinder head
bolts No. 1 - 10 |
70
lb/ft |
| Cylinder head
bolts No. 11 - 14 |
20 lb/ft + lock
tight |
|
| Distributor clamp
bolt |
14
lb/ft |
| Exhaust manifold
to cylinder head |
16
lb/ft |
| Fan
attachment |
9
lb/ft |
| Flexible drive
plate to starter ring |
25
lb/ft |
| Flexible drive
plate to crankshaft |
60 lb/ft + lock
tight |
| Flywheel to
crankshaft |
60 lb/ft + lock
tight |
|
|
| 4.0 & 4.6 Torque
settings |
Below are the torque settings for 4.0 litre and 4.6 litre Rover V8
engines.
| Description |
Torque setting |
| Mains Bearings 1
- 8 |
13.5 NM first
time round then 72NM |
| Mains Bearings 9
-10 |
13.5 NM first
time round then 92 NM |
| Big
Ends |
20 NM and then
90o more. |
| Side
Bolts |
13.5 NM first
time round the 45 NM |
| Head Bolts (10
bolt head) |
25 NM then 90o
then 90o again. |
|
|
|
| Engine overheating problems |
Normally, overheating
would be caused by one of the following. This however can only be true if
there are absolutely no internal signs of gasket failure, block cracked (mainly
older 3.9s & 4.2s and this fault cannot be seen (see below)), or external
water leaks. We would always recommend head & block pressure testing, or at
least a chemical block.
1. Not all temperature gauges are
reliable. Try attaching an external gauge to check readings are correct.
Also make sure you are using adequate engine cooling fans, we recommend Pacet
cooling fan systems.
2. Check the condition of the radiator (if
not new). Some have been filled with
sealer in their life, and circulation can be a problem. Also, if the fragile
cooling fins are corroded or missing, the radiator will struggle to keep the
engine cool. Many altered vehicles may have restricted air flow to the
radiator, this may sound trivial but is worth considering.
3. The
most common problem is caused by air locks. You need to be sure to remove
all air in the system. One of the most common traps is in the heater radiator
inside the car; this can be cleared sometimes by flushing it. To do this remove
the two pipes that pass through the bulkhead, get a high-pressure garden hose
[if you use a commercial high-pressure washer you must not force all the
pressure through the radiator so hold the spay a few cm. away]. What happens is
that for many years the water has passed through this radiator always in the
same direction, this means that deposits build up inside, flushing in both
directions will normally reduce the amount of blockage.
4. And
most important, if you cant cure or find it, don't drive it. Overheated
engines will cause the oil pressure relief valve to stick open and cause
irreversible damage.
|
|
| Engine Overheating Problems 3.9 and 4.2 only (pre
96)? & 4.0, 4.6 post 96? |
Overheating starts with water loss. The early 3.9 and
4.2 (pre '95-'96) engines were basically an over-bored 3.5 casting with 4mm
extra on the diameter of the liners. This caused a reduced thickness of
aluminium between the water jacket and the cylinder bore. The subsequent water
loss problem normally starts off as just a water light that appears once a
month or so, then once a week, until it becomes a permanent feature. The normal
unsuspecting owner will have by this time paid for heads to be skimmed and
gaskets to be changed, and they will have spent a lot of money already. So,
although the engine functions fine, it is a permanent worry leading towards a
total engine failure.
Many might be excused for thinking that the
overheating is caused by running the engine in a hot climate, or with a
radiator problem, or even insufficient cooling fans or oil cooler, but we can
assure you this is not normally the case.
3.9 & 4.2 The true
& main reason these engines run very hot is due to the fuel/air ratio, or
fuel mixture, that is controlled by the engine EFi computer (ECU Chip) from the
factory. This was designed to run very lean through the mid range to make
altitude driving or mid range emissions (tested in some countries) less of a
problem, the upshot of this however is that when these engines are used on low
quality or low octane fuels, or when the engines are upgraded with items even
as minor as a free-flow air filter or exhaust headers & Cam/Head upgrades,
although all of these are only mild upgrades, they will make a weak engine run
even weaker and the problem will get closer!
The solution is simple (if
it's not cracked already), fitting our Optimax or Tornado Eprom (ECU Chip) will
give your engine the near perfect fuel/air ratio it deserves, thus giving lower
engine internal temperatures and giving, without other modifications to all,
15% efficiency boost [power and economy} & also allow the upgrades you have
already done to be beneficial at last, instead of being detrimental.
3.9 & 4.2 ECU info
'Click'
4.0 & 4.6 (new shape) suffer a similar but
normally less dramatic problem although these engines are much stronger. The
same air/fuel ratio problem will arise with low octane fuels, you will not
normally suffer cracked blocks, but you will cause the liner to shift from its
seat or cause sticky valve guides (partial seizure), and the solution is much
the same as the 3.9 & 4.2 above, an ECU re-chip will sort it out and more
Gems ECU info 'Click'
All cracked engines (blocks) are not normally repairable due to the fact
that it will crack behind other liners, even if you could effectively repair
the one at fault.
If you are undecided about where the problem
actually is, then the next job would be to remove the heads, and if you see
nothing suspect the worst (the surest way to tell if your engine is suffering
from this problem is the fact that you can find nothing obviously wrong). You
could have the heads & block pressure tested if you are still not
convinced).
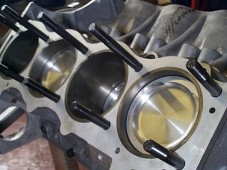
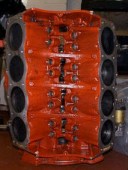
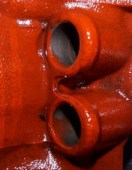
It's no
coincidence that the Piston on the right (no 7) seems to have been
'steam. cleaned'
 |
|
This is a sure sign of the cylinder
block being cracked somewhere behind it. In many cases such as this one you
will also find that the cylinder liner has moved down the bore slightly. The
problem with this engine had been wrongly diagnosed by the main agent (at a
cost of £600.00) as a 4 thou. warp in the centre of the head.
Want to see more?
This is clearly incorrect. But please be
sure, this is not a problem caused by the 4.6 engine itself, or indeed any of
the smaller V8s, but is caused by the very weak fuel maps they are subjected to
with modern (un-chipped) std. fuel injection ECU.s, and the resultant very high
cylinder temperatures they run!
|
|
|
| Why should I be careful buying a 'used 3.9 or
4.2'? |
Buying used 3.9, 4.0, 4.2
or 4.6 engines. Please be very very sure if you purchase a 'used engine'
that you get a written warranty from a reputable supplier. However, also
realize that although they might refund your money, they cannot replace your
wasted time and fitting expenses (one reason why RPi. will not sell used
engines).
You can find more (and some the same) on our V8 general
information page
|
| Adjusting
end float, mains bearings. |
| All oversize bearings have oversized
thrusts, therefore the crank end float must be adjusted on no 3 (centre) end
cap. To do this - take 2 pieces of 1000/1200 emery paper and a flat surface,
i.e. glass. Rub down thrusts equally on both sides until a clearance of 6-14
thou is achieved. |
| Setting up and checking for problems. |
First remove advance vacuum pipe from intake and check
for positive vacuum when throttle is applied.
Check (if fitted) that the vacuum delay module is not
blocked.
Check positive vacuum will pull distributor advance
whilst also checking vacuum module is not holed (when sucking the pipe, the
base plate of the distributor should rotate anti-clockwise about 15 deg.).
Check condition of rotor arm for signs of damage or
arcing, also check cap and clean contacts (better still fit new).
Check rotor for free play, there should be none, either
rotationally or side to side.
Check rotor will turn clockwise through about 20 deg.
and smartly retract back to its home position under good spring tension.
Distributor output is known to be weak, so upgrading
with our Spark amp is recommended (see below).
Replace plug leads preferably with Magnecor. Use good
quality Plugs such as NGK BP6ES, and avoid fancy plugs, as they don't normally
last long.
A check list of common simple issues
.Being sure of TDC with regard to crank-indicated timing
mark is a must.
Plug gap needs to be 0.8mm - 0.9mm.
Don't use resistor plugs and suppressed leads
together.
Std. spec. high street leads may not be able to handle
the extra spark KVs.
Check fuel delivery pressure.
Check carb. float bowl height.
Check no blocked or restrictive fuel filter in line.
Do you have the fuel return hose (to the tank) connected
? If so, it needs restricting.
Try an alternative coil even if yours is new.
|
|
. For other Injection related
problems & chipping issues see relative injection pages.
Never underestimate the quality of std, O/E, or High street spec. ignition
leads.
A typical e-mail quote 'Thank you for helping me
sort out my misfire problem with the amplifier. You may recall when we spoke
that I said that the misfire was when on LPG when the engine was cold. You
recommended fitting Magnacore leads as well, but as I had new Lucas leads
fitted I said that I would try them out with the amplifier first. The result is
the engine is sweet as a nut when cold and a definite improvement in power and
fuel consumption.
I am very pleased with it and will be recommending
other gas users I speak to. Yours sincerely Peter Munday
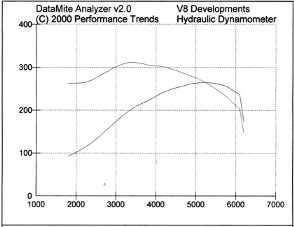
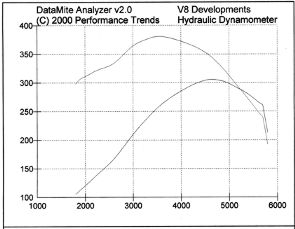
Below are the graphs for 5.0 and 5.3 litre V8
engines that we have recently had dynode. More info soon
Click the
graphs for a more detailed (higher res) version |
5.0
litre
 |
5.3
litre
 |
|
|
|
|
|