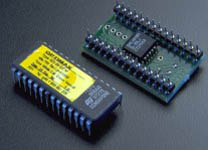
Injection System Hardware upgrades. |
Seeking maximum Power? Or perhaps Your TVR 500 just doesn't reach The 'Mark'?
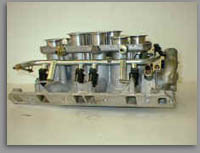
The following pictures (below) show additional improvements that are available for achieving maximum power from the standard Rover Injection induction systems.
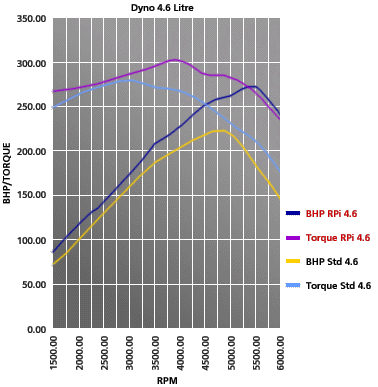
Although not necessary for standard or most fast-road engines, these induction enhancements would be essential for higher performance rebuilds and will vastly improve the power attainable at engine revs beyond 4500rpm, allowing the V8 to climb up to 7500rpm & beyond 350Bhp.
You've seen Jeremy Clarkson's Grin, as he exits the cockpit of a TVR 500, but he ain't seen nothing yet!!
 |
 |
 |
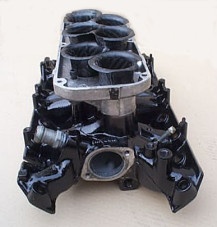
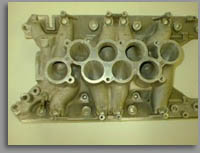
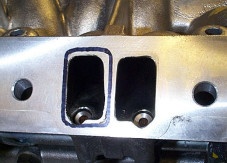
| Extensively ported manifold & shortened trumpets |
Big throttle body plenum 70, 75 or 78mm |
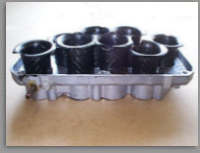
Close up view of the shortened & polished trumpets |
|
 |
 |
 |
| Modified & ported injection manifold (top view) |
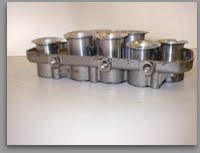
Flowed, shortened & polished trumpets (top view) |
Carbon Fibre 48mm spread bore trumpets, on ported and matched intake |
|
The total cost of these performance improvements is from as little as £675.00 (excluding special Tornado Chip) & can be utilized with both 'Gems', 'Hot Wire' & 'Flapper' type injection systems. All parts are supplied on an exchange basis, and an upgrade to carbon fibre trumpets is an additional £65.00
|
V8 Fuel Injectors.
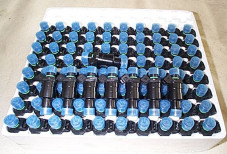
At last Now Back in Stock. |
Shown with protective caps fitted
Brand new 3.9, 4.0 4.2 and 4.6 Injectors, less than 1/2 list price. One of the main reasons for poor fuel consumption on all 3.9, 4.0 and 4.6 models is old injectors. At only £240.00 (You change you plugs every 6,000 or 12,000, when did you last change your injectors? For a set of 8, these have to be the best value anywhere.
(recon Injectors also available) |
| |
|
|
|
Some ask us how can we possibly make things better than the original Rover Spec.
Well, just take a look at this 3.9 intake, and perhaps you may start to understand just how easy it is.
| |
|
 |
 |
| |
|
| Stock Cylinder head ports with intake gasket shown |
This shows just how badly the std. engine is port-matched & the exhaust is not much better. |
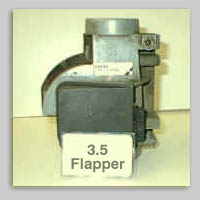
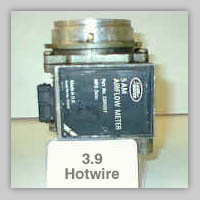
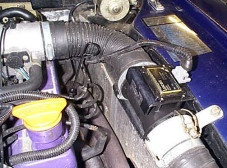
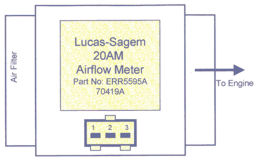
| Airmass Meter upgrade from 3.9 / 4.2 Howire to 4.6 Gems. (20AM) |
To get the best from you higher Performance upgrade, it is worth noting the big advantages of up-grading the Air flow/mass meter. As you can see from the upgrade on this TVR 500 Griff, the 3.9 Airmass meter (retained by TVR) has a very restricted aperture and should be upgraded for maximum power benefit.
TVR 500 Griff.
 |
|
| 20 (Gems 4.6) Air Mass Meter Fitted. |
|
You can see the substantial air flow advantages of this upgrade. |
 |
|
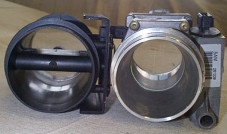
Gems 4.6 & Hot Wire 3.9/4.2 AMM. |
There are many improvements available for the Injection hardware on all the systems, and it is attention to detail such as this that helps gain the power claimed but missed by most users of this engine.
Suitable for all type of Rover V8 injection systems. Further upgrades and power figures for all our highest spec injection systems and large capacity engines can be found here (Engines 4.6 to 5.2) If you are really serious about power, this is the page you should visit.
The maximum potential of the Rover Injection System and other induction methods is always pegged below 400bhp due to the limitations of Rover original head castings. Ask about 'Ultimate Big Valve Heads' if you want to push the limits beyond comprehension, but beware, these heads start at £1,250.00 per pair.
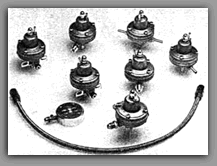
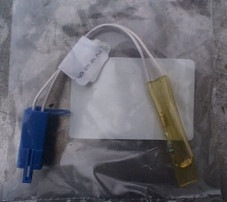
| Tune resistors & More |
And for the more Technically minded.
Tune resistor info (for those that want to know)
Please note that although the information below is still correct it has been updated here.
All Efi 'Hot wire' systems will incorporate a Tune resistor. Its function is to make sure the vehicle runs the correct Fuel map in the ECU for Cat or Non cat vehicles. If you cannot locate yours the following may be relevant.
There were definitely some EFi looms made after 1990 with the tune resistor taped inside. From 1990 onwards (14CUX systems) they all have to have one, but you've got to find it first!
If there is no tune resistor, then the vehicle will run on the default 'Limp Home' map. Where the resistor is fitted externally, it will be where the relays sprout out of the loom, not by the ECU. PRC9060 is a normal ECU with the regular set of maps in it.
A Green tune resistor (green referring to the color of the wires) will always give a non-cat tune, and White is always a cat tune. By the way, the default (Limp Home) tune is a cat map, so this usually makes a non-cat car run very rich.
You need to run the correct tune resistor to get the correct fuelling from your ECU and you need to re-chip all Hot wire ECUs if you have upgraded your engine spec. in any way. Especially if increasing capacity or changing cam, and even for stock engines, the Optimax chip will refine your efficiency, economy and performance.
For those 'Even More' technical. A tune resistor should be connected between pins 5 and 27. The wire colors are Black/White and Black/Grey (where the first color is the primary color, and the second is the trace). The Green tune resistor value is 470 Ohms, and White tune is 3900 Ohms. Ordinary 1/2 Watt resistors are just fine, although the original is a Metal Oxide 2% item (which I always use anyway). In this location I sometimes use a 1 Watt resistor, because the larger physical size makes them easier to handle.
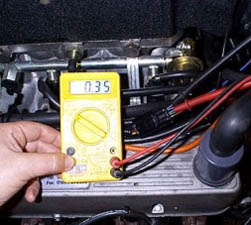
| Setting Air Mass/Flow Meter & Throttle Pot. |
Any competent garage should find this very easy indeed.
Switch ignition on but do not start.
You require a digital multimeter to carry out the adjustments.
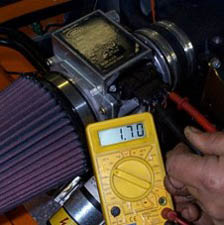
Air Mass Meter |
Throttle Pot |
Find the Throttle pot on side of plenum. There are three (3) wires coming from this unit to a multi plug. Do not disconnect. Wire colors are Red, Green, Yellow. Red from volt meter to red wire of pot. Black wire from volt meter to Green of pot. Volts should read .33 to .35 volts if not, loosen the two (2) screws that hold it in position and turn it to get the correct voltage. If you cannot get the correct voltage setting, undo and remove the throttle pot, make the fixing holes elongated and you will be able to get the right voltage.
Please note that the following air flow meter settings should be made when the engine is warm.
The air flow meter wires can be accessed by pulling the rubber boot carefully backwards along the cable. Under here you will find the following wires. Red with Black trace = Sensor ground, Blue with Green trace = air flow signal, Brown with Orange trace = Ignition live 12 volts and Blue with Red trace = CO trim value. A digital multi meter should be used and connected to the sensor ground and CO trim value wires. The values that you are trying to achieve are below and these are adjusted by the screw on the side of the airflow meter.
Air Mass meter setting (non cat). The voltage reading on the CO value here should be between 1.0 and 1.5. If you have the Tornado ECU chip fitted then 1.5 volts should be aimed for.
Air Mass meter setting (cat). The best setting for the CO value here is 1.8 volts.
When setting your Throttle potentiometer and Air Mass/flow meter, you should also check the resistance scaling, using an Ohms meter and checking from highest to lowest resistance, smooth scaling is essential for the correct basic workings of all these units. |
All High performance and big capacity Hot Wire V8s should consider upgrading to the 4.6 Air Mass Meter as shown above. |
| Upgrading 3.9 Air Flow Meter to 4.6 (wiring) |
WHAT TO DO UNDER THE BONNET:
Ensure your ignition is switched off.
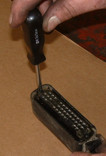
Disconnect the Fuel Injection ECU
Disconnect and remove the old Airfolw Meter, then fit the new one in place.
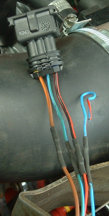
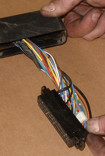
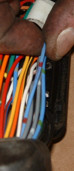
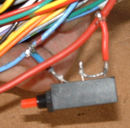
Cut off the old airflow meter plug (4 wires). Tape back the Blue/Red wire (CO Adjust signal) as seen in picture, which will not be connected to the new Airflow Meter.
Put the new rubber connector boot or silicone seals over the wires.
Crimp the new connectors onto the wires.
|
|
With reference to the diagram on the right, make the following connections to the new Airflow Meter (Note: Incorrect connection will destroy the airflow meter and invalidate the warranty)
1 - Brown/Orange (+12 Volt Ignition Switched)
2 - Blue/Green (airflow Signal)
3 - Red/Black (signal Ground)
|
Copyright Mark Adams
|
|
|
INSIDE THE CAR:
Remove the rubber seal inside the ECU plug, then remove the two securing screws. Then slide back the connector shell.
|
Please make sure that in the next step you find the correct wires (by tracing them back to the pin number on the plug).
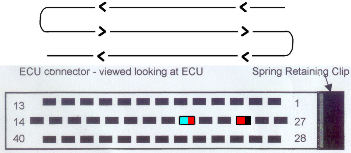
Please see the diagram to the right for relating to the pin numbers. |
The arrow on this diagram represents the order of the pin numbers.
|
Identify the following wires in the ECU plug
(as seen in pictures)
Blue/Red on pin 22 (CO Adjust)
Red/Black on pin 25 (Signal Ground) |
|
|
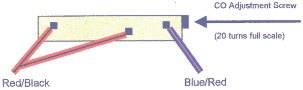 |
Connect the CO Trimmer between the above two wires (see diagrams to the right) by tapping into them.
Do Not cut either of these wires.
|
Plug in the ECU and turn on the ignition, but do not start the engine. Adjust the CO Trimmer until a reading of 1.3 Volts is obtained across the terminals. (Note: higher Voltage gives higher CO)
Switch off the ignition. Insulate all connections. Reassemble the ECU connector, and re-fit the ECU.
The CO Trimmer may be located inside or outside the ECU connector shell. Outside gives easier access for idle CO adjustment.
The Engine will not run untill matching ECU EPRom chip has been installed.
|
| Customer comments |
Defender 90 4.6
We fitted the RPI chip to our modified Defender-90, which it fitted with a warmed over 4.6L Rover V8, and it made it come alive! It also cured the rich running problem at cold start-up that it had since new.
Michael Green@West Coast British. USA.
Follow up:-
Just returned from eastern Nevada, our trip was some 1500 miles over the weekend in the 4.6L D90; Chip made huge gains on and off road... cruised at 90+mph on freeway with no trouble and pedal left over... did over 100 for fun! In the mountains where 4th was the key, big gains yet again! Great set up now. MG
|
Range Rover Optimax Upgrade
After having a good drive back to Northampton last night, the differences made by the chip became very apparent, and the car has been measurably improved in both performance and driveability.
Cheers, Bill Barclay. Scotland.
|
TVR Tasmin 400se 1991 - 4.0L
Chris, Just a note to let you know how the EPROM change went. History of car: TVR Tasmin 400se 1991 - 4.0L hotwire. Big Valve Heads and uprated camshaft (origin: Wedge Automotive, but spec unknown). The car is also fitted with big bore 3" exhaust. The car was over fuelling and was generally uneconomical. It was subsequently found to have the 4.5L EPROM in the ECU - obviously to try to increase fuelling after mods. I purchased one of your Optimax chips and am generally pleased with the results. It has cured erratic idle problems and given me an increase in mid-range torque. It also makes the engine a lot more flexible - with the ability to pull from lower rpm.
|
Range Rover Discovery Chipping.
I've now had my Disco at SAC (www.steves.co.za) who must rate as the most reputable tuning house in SA:
Here are my findings as measured at the wheels with 2 wheel dyno by SAC on both occasions:
With 3.9 + Unichip + 245/70/16 tyres: 82KW @ 4300 / 250Nm @ 3300
With 4.6 +Unichip + tornado chip +245 / 75 (!!! NB !!!) / 16 tyres: 111Kw @ 4300 / 307Nm @ 3400 Above figures were measured at 1500m above sea level. SAC found the TORNADO was running a little lean at low RPM and a little rich at high RPM but acknowledged that it was one of the best chips they've come accross.
This (and timing) was corrected with the UNICHIP. Before they tuned it, it was idling rough, and backfiring on overrun. Now she idles smooth, and the backfiring is limited only to a very abrupt "parp" immediately after releasing the throttle - must be for less than 0.25 seconds. The rest of the overrun is clean. My conclusion is that I am very satisfied with the result and I feel I got my money's worth. PS: I'm already saving for a 5.2 for the HSE - yet to be purchased ;-)
Kind regards Philip Lochner South Africa.
|
TVR 4.3 Griff. T Wolk. Germany
Hello Chris, First of all I wish you a happy and succesfull new year. I plugged in the Tornado chip and did a little test driving. The road conditions were not good the last few weeks so I could not run at full power, but I felt that the engine ran much better at low revs. A rather uncomfortable behavior which in german is called "Schieberuckeln" (when the car starts rocking after RPMs fall under 1500 and the throttle is closed) is nearly eliminated. I look forward to the improvement of the RPM range above 5000...
Reply.Assuming no engine component wear, this may be down to you ignition system, Want to upgrade it next?
|
|